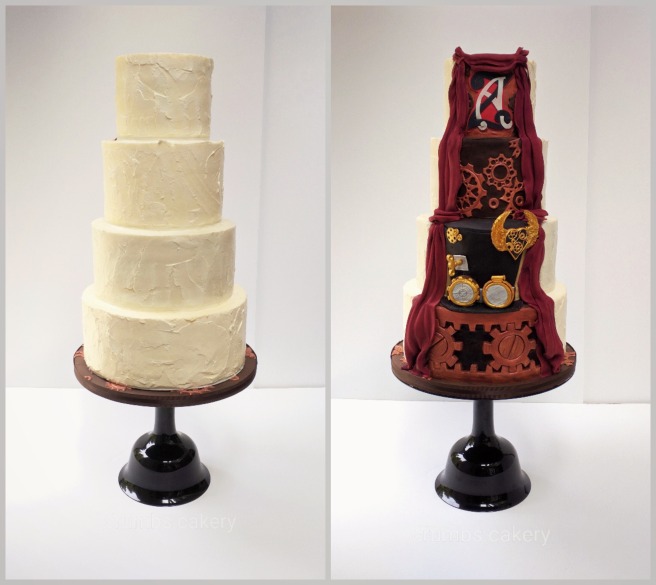
 I love unique wedding cakes. Cakes where little tales are told, tiny hints of stories that ties the couple together and made them fall in love with each other. For instance, a hose clamp (a broken down car incident, apparently) or copper gears. In this case lots and lots of gears…
Yup, you’ve guessed it (I guess the title might have given you a hint). This cake was all about Steampunk. Now the bride wanted to surprise her husband with the Steampunk elements of the cake and opted for a Peek-a-Boo design. The front was super simple white spackled buttercream and the back third told the couples love story in Steampunk language. Isn’t that just awesome?
The most important detail of any Steampunk themed cake is in my opinion the gears. And that’s what I am sharing with you today. How to make edible, metallic gears.
 I started with paneling a third of the cake in brown fondant. Sometimes it can be tricky to maneuver big heavy pieces of fondant onto the side of the cake. That’s were your caking friend, the wax paper comes in handy.


Roll your fondant a bit bigger than the size you need. Take your piece of wax paper, which needs to exceed the size of the actual fondant piece, and put a thin layer of shortening on it. Place the wax paper, shortening side down, on to your fondant and flip it around. Make sure that the bottom of the wax paper and the fondant is as straight as you can get it. Trim your fondant piece to the desired size, all the while making sure you have a nice wax paper overhang on the side.


Add another super thin layer of shortening, or a bit of water to your fondant panel, grab your wax paper (that’s were the overhang is needed) and carefully line it up with the bottom of the cake. Press it on gently and smooth it out with your fondant smoother. After you made sure it’s attached peel the wax paper back and your panel is done!
Next step is the fun part, making gears.

You will need smallish geometrical cutters. The ones I used are Ateco Geometric Cutters, numerous sizes of round cutters, and my favorite of them all the really small jelly cutters. Those little guys are just perfectly sized and I end up using them in many, many projects.
Different sized piping tips will also come in handy and wax paper, of course!
All right, here we go:


I used a 50/50 fondant, gum paste mixture and colored it a light beige. Roll it out pretty thin and start cutting out a simple round shape. Next step is to cut out the center hole. Try to line up the center with the grid on your working mat. This will make it a lot easier to line up the distances between your cuts. Depending on your gear design you can now start using your different shaped cutters and go crazy. I indented a ring half an inch off the outer circumference and lined up the top of the small hearts with that circle. Add as many little holes as you like.


Take an oval cutter and cut the outer ring to give it the official gear look. Grab your wax paper, apply a very thin layer of shortening and attach it to the gear. Flip it around and place it on your panel. The reason I use wax paper once again is that the gear is still very soft and since it has so many holes it will completely deform if I would pick it up with my hands.


Create as many gears you need in as many shapes and sizes you like. The sky is the limit, just have fun with it. Once all the gears are in place it’s time to paint them.

Painting cakes is one of my favorite bits. At times I even prefer painting a whole cake covered in white fondant rather than just coloring the fondant before applying it to the cake. There is something very calming in that process and it gives the cake a completely different texture and feel.


For the color I used Global Sugar Arts edible copper luster dust and mixed it with lemon extract. The consistency you are looking for with metallic paints should be similar to maybe nail polish. You want to have a thick bead on your paintbrush. If it’s too thin you might not get enough coverage and it’s a bit tricky to paint a second layer with metallic paints. There’s a high possibility you’ll take off some existing paint with the new brushstroke and it will look very uneven. If your mixture is too liquid, no fear, the lemon extract evaporates super fast. Just stir it a bit and wait a bit and then you’re ready to go!

Happy Caking!
